Docker镜像仓库
一. 使用Dockerfile制作镜像
a: 撰写dockerfile文件
b: dicjer build -t 镜像名
二. 镜像仓库
镜像仓库分为公共的镜像仓库,如:hub.docker.com、developer.aliyun.com/mirror/docker-ce等
和私有的镜像仓库: 如harbor、阿里云个人镜像仓库等
三. 私有镜像仓库
1. 阿里云个人镜像仓库
从本地将镜像推送到阿里云个人镜像仓库的步骤为
a. 登录阿里云个人镜像仓库
docker login --username='XXXXXXXX' registry.cn-beijing.aliyuncs.com。密码点击“设置固定密码”进行设置。
b. 修改推送镜像的tag
格式:docker tag busybox:latest 镜像仓库服务器地址/命名空间名/镜像名:tag
比如docker tag alipine:latest registry.cn-beijing.aliyuncs.com/aio169/alpine:latest
c. 执行推送
d. 退出登录
2. Harbor 私有镜像仓库
Harbor 是由 VMware 发起、现由 CNCF(云原生计算基金会)托管的开源企业级容器镜像仓库,属于 CNCF 毕业项目。它为云原生环境提供安全、可信、高效的容器镜像存储、分发及管理服务。
核心架构与兼容性
Harbor 高度兼容 Docker Distribution 及 OCI(开放容器倡议)镜像分发规范,Docker、Podman、Kubernetes 等标准工具均可无缝对接,无需额外改造。
核心功能
| 功能 | 说明 |
|---|---|
| RBAC 权限控制 | 基于角色的访问控制,按项目级别分配权限(管理员、开发者、访客等);集成 LDAP/AD 等企业身份认证系统 |
| 安全漏洞扫描 | 内置 Trivy 等扫描引擎,对镜像层进行 CVE 静态分析并生成安全报告 |
| 异地镜像复制 | 支持跨数据中心、跨地域的增量自动同步,解决大规模分布式场景下的拉取延迟和带宽瓶颈 |
| 图形化管理 | Web 控制台可视化管理镜像、标签、项目资源;支持全操作审计日志 |
| 存储后端抽象 | 支持 S3、Ceph、NFS 等多种存储后端;内置垃圾回收(GC)清理废弃镜像层 |
部署方式
Harbor 采用微服务架构,组件(核心服务、数据库、Redis、Web 界面等)均以容器化方式部署,官方提供 Docker Compose 和 Helm Chart 两种部署方案。
适用场景
与 Docker Hub、阿里云 ACR 等公共云镜像仓库不同,Harbor 的核心定位是内网私有化部署,主要应用于:
- 对数据安全合规有严格要求的企业内部环境
- 政府政务云、金融私有云等网络隔离场景
- 需要脱离公网独立运作、避免数据泄露风险的环境
小结: Harbor 不仅是镜像存储系统,更是集安全、认证、跨地域分发于一体的云原生基础设施组件,是支撑企业大规模容器化战略落地的重要中间件。
Harbor 搭建步骤
a. 安装 docker-ce
b. 安装 docker-compose
c. 安装 harbor
四. 搭建私有镜像仓库
1. 搭建阿里云私有镜像仓库
Ⅰ. 阿里云网站端创建用户
a. 登录到阿里云网站控制台并试用ARC

b. 创建个人版ARC
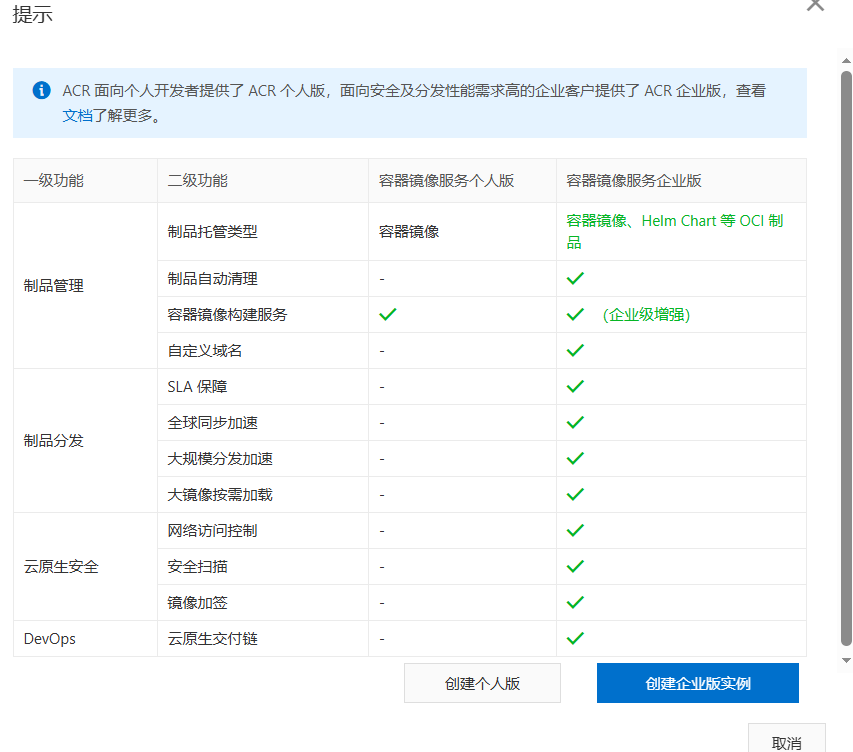
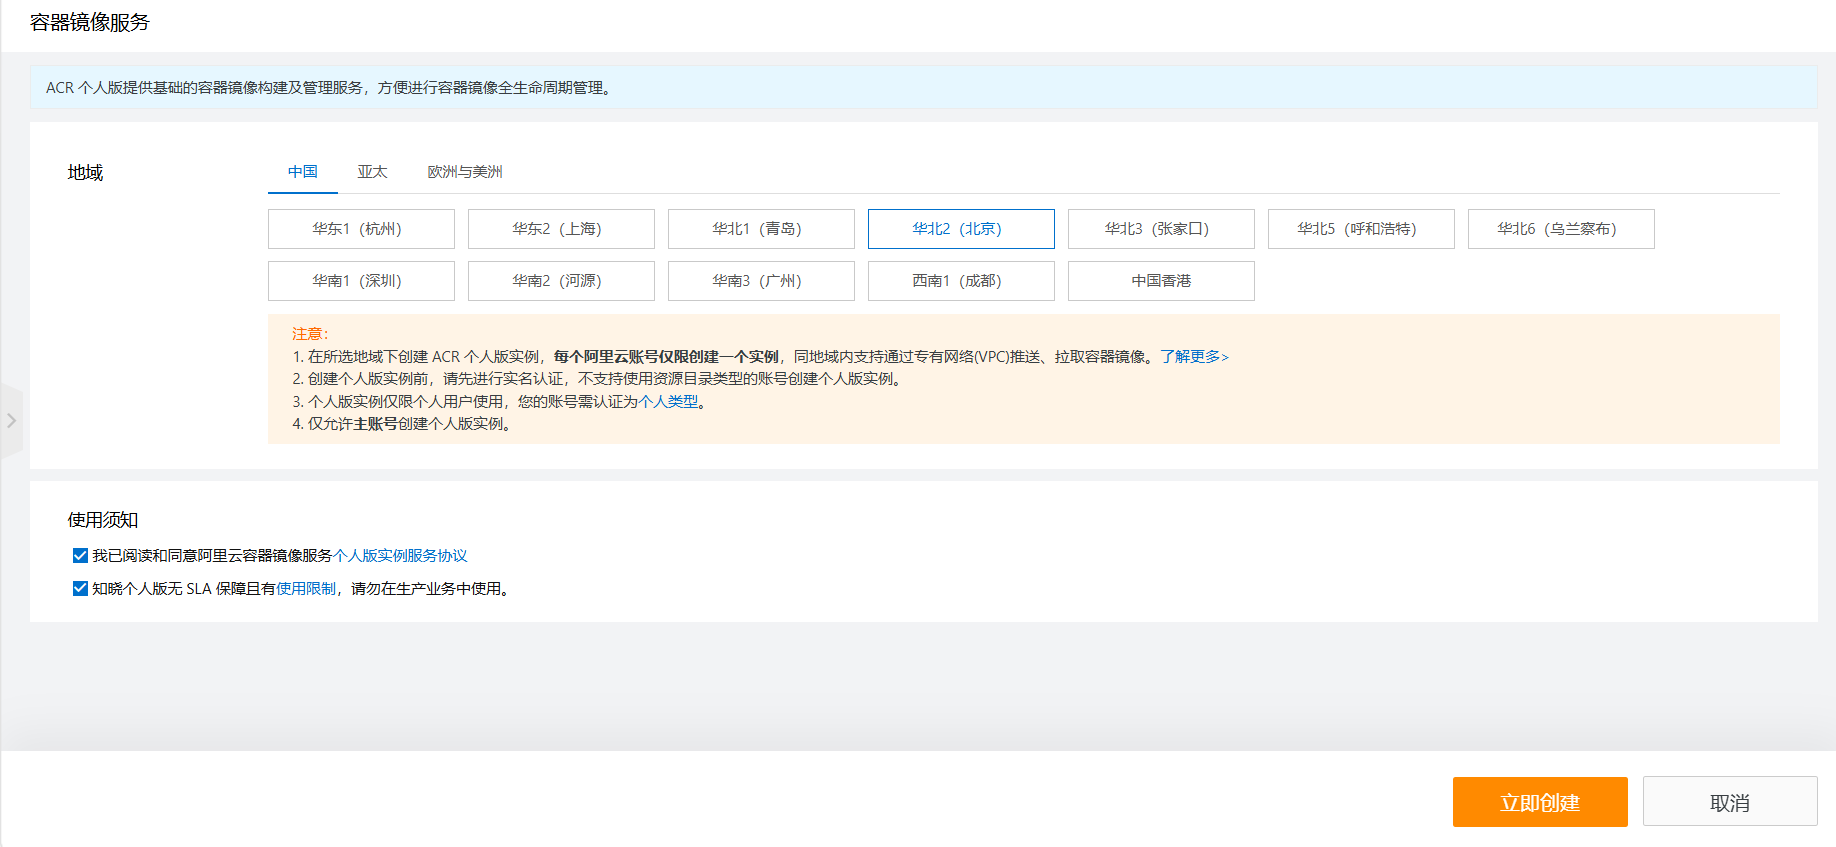
c. 地区选择“华北2(北京)”
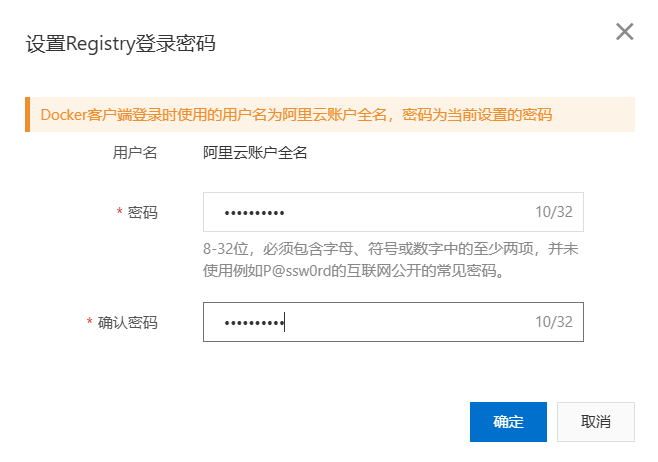
d. 设置登录密码
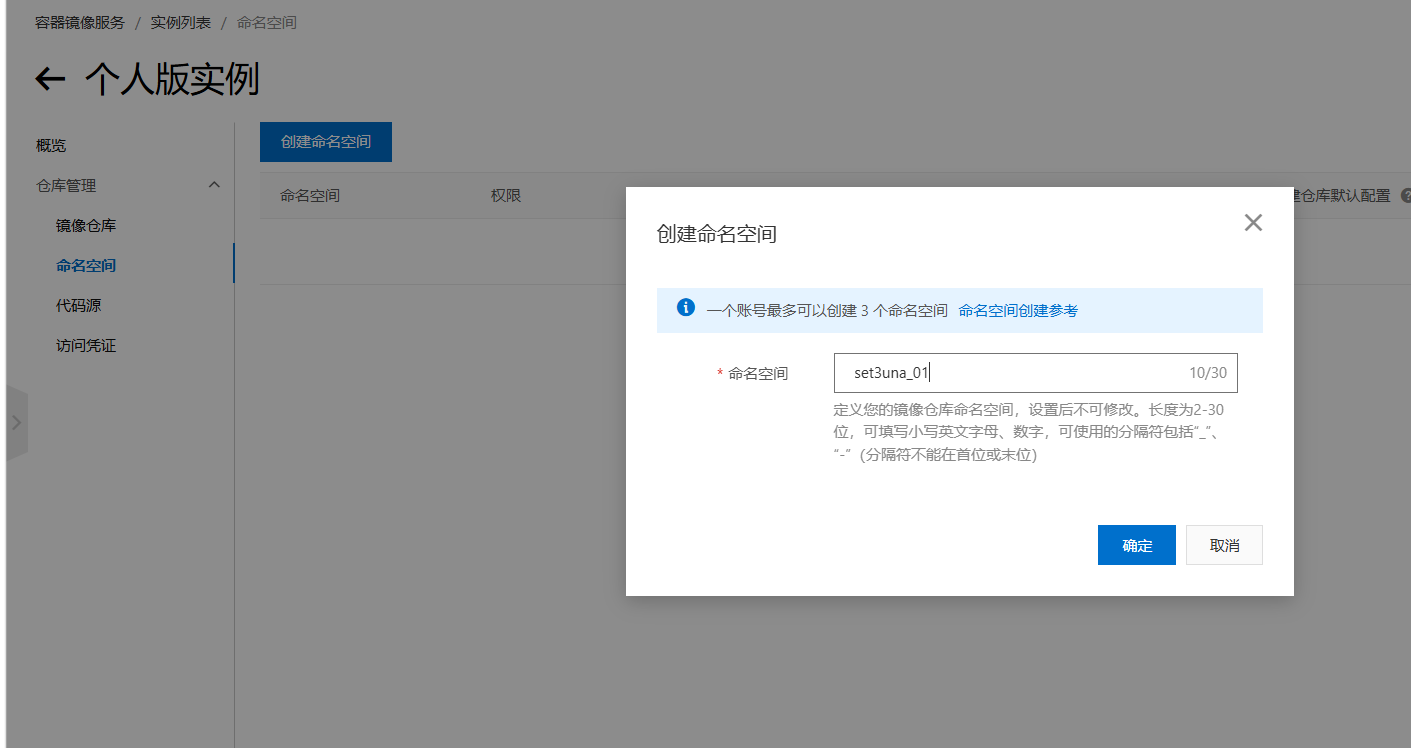
e. 创建命名空间
Ⅱ. 在虚拟机中登录阿里云镜像仓库并将虚拟机中镜像推送到阿里云镜像站中
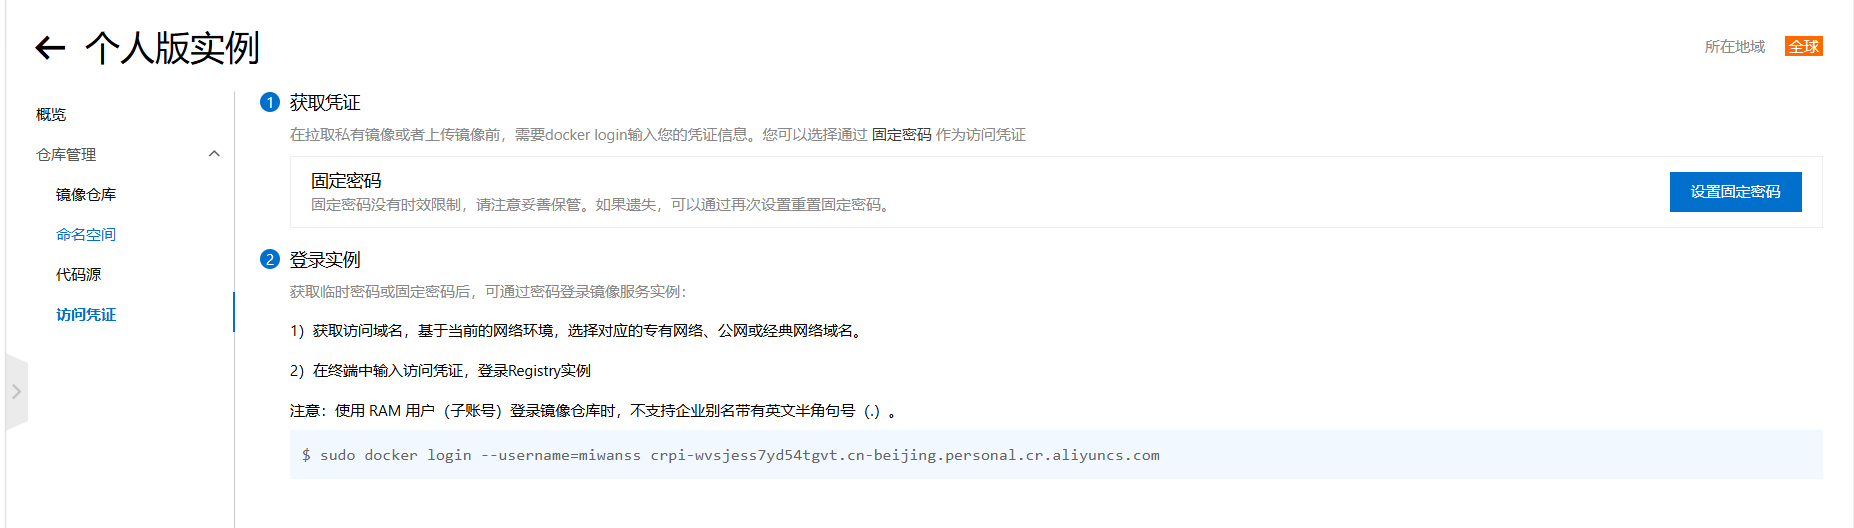
访问凭证
# 登录到阿里云个人仓库
[root@4 ~]# docker login --username=miwanss crpi-wvsjess7yd54tgvt.cn-beijing.personal.cr.aliyuncs.com
Password:

WARNING! Your credentials are stored unencrypted in '/root/.docker/config.json'.
Configure a credential helper to remove this warning. See
https://docs.docker.com/go/credential-store/

Login Succeeded

# 查看当前所有的镜像

[root@4 ~]# docker image ls
                                                                                                i Info →   U  In Use
IMAGE                  ID             DISK USAGE   CONTENT SIZE   EXTRA
busybox:latest         fd8d9aa63ba2       6.74MB         2.23MB
debian:bullseye-slim   cba95a21c96c        124MB         32.9MB
httpd:latest           393435ee1a31        175MB         47.6MB
jkd21:v1.5             c5ec4001e8ea       1.01GB          399MB
myng:v1.1              ea837570a525        676MB          202MB    U
rockylinux:9           d7be1c094cc5        260MB         68.9MB
testnginx:v1.0         233094b6c82f        676MB          202MB    U
tomcat:v1.5            402a4f433598       1.04GB          414MB    U

# 将tomcat:v1.5修改镜像tag然后推送

[root@4 ~]# docker tag tomcat:v1.5 crpi-wvsjess7yd54tgvt.cn-beijing.personal.cr.aliyuncs.com/set3una_01/mytomcat:v1.5
# Docker镜像是分层构建的,也是分层推送的。所以推送一个镜像能看到六条记录
[root@4 ~]# docker push crpi-wvsjess7yd54tgvt.cn-beijing.personal.cr.aliyuncs.com/set3una_01/mytomcat:v1.5
The push refers to repository [crpi-wvsjess7yd54tgvt.cn-beijing.personal.cr.aliyuncs.com/set3una_01/mytomcat]
9e30fad9cb1e: Pushed
344bd630c4b0: Pushed
ab6b8caf16d7: Pushed
4f4fb700ef54: Pushed
8f217927f3d2: Pushed
1d6369a586eb: Pushed
v1.5: digest: sha256:402a4f433598dbded3d733985f8931f78786268c34eb7dbf591cc65e5b0049c8 size: 856

# 退出登录
[root@4 ~]# docker logout crpi-wvsjess7yd54tgvt.cn-beijing.personal.cr.aliyuncs.com
Removing login credentials for crpi-wvsjess7yd54tgvt.cn-beijing.personal.cr.aliyuncs.com
Ⅲ. 返回网上查看验证

2. 搭建harbor服务器
Ⅰ. 环境
docker服务器4 192.168.100.102
harbor服务器1 192.168.100.99
Ⅱ. 在1上安装docker
mount /dev/sr0 /media/cdrom
dnf -y install yum-utils
rpm -ivh  https://mirrors.aliyun.com/epel/epel-release-latest-9.noarch.rpm
sed -i 's|^#baseurl=https://download.example/pub|baseurl=https://mirrors.aliyun.com|' /etc/yum.repos.d/epel*
sed -i 's|^metalink|#metalink|' /etc/yum.repos.d/epel*
yum-config-manager --add-repo https://mirrors.aliyun.com/docker-ce/linux/centos/docker-ce.repo
dnf clean all && dnf makecache
dnf -y install docker-ce docker-ce-cli containerd.io docker-buildx-plugin docker-compose-plugin
  sudo mkdir -p /etc/docker
  sudo tee /etc/docker/daemon.json <<-'EOF'
  {
    "registry-mirrors": [
      "https://docker.1ms.run",
      "https://docker.xuanyuan.me"
    ]
  }
EOF
systemctl start docker
systemctl enable docker
Ⅲ. 安装docker-compose命令
从 Docker 引擎 20.10 版本开始,官方已经把 Compose 作为内置插件集成进去了。
可使用命令docker compose version查看
Ⅳ. 在github上找到harbor的下载链接,然后下载离线版
[root@1 ~]# wget https://github.com/goharbor/harbor/releases/download/v2.15.2/harbor-offline-installer-v2.15.2.tgz
[root@1 ~]# ls
harbor-offline-installer-v2.15.2.tgz anaconda-ks.cfg
[root@1 ~]# tar xf harbor-offline-installer-v2.15.2.tgz -C /usr/local
[root@1 ~]# ls /usr/local/
bin  etc  games  harbor  include  lib  lib64  libexec  sbin  share  src
[root@1 ~]# cd /usr/local/harbor/
[root@1 harbor]# ls
common.sh  harbor.v2.15.2.tar.gz  harbor.yml.tmpl  install.sh  LICENSE  prepare
[root@1 harbor]# cp harbor.yml.tmpl harbor.yml
[root@1 harbor]# vi harbor.yml
Ⅴ. 修改harbor配置文件
hostname: 192.168.100.99

http:
  # port for http, default is 80. If https enabled, this port will redirect to https port
  port: 80


harbor_admin_password: Abcd!!1234

# Harbor DB configuration
database:
  # The password for the user('postgres' by default) of Harbor DB. Change this before any production use.
  password: root123
  # The maximum number of connections in the idle connection pool. If it <=0, no idle connections are retained.
  max_idle_conns: 100
  # The maximum number of open connections to the database. If it <= 0, then there is no limit on the number of open connections.
  # Note: the default number of connections is 1024 for postgres of harbor.
  max_open_conns: 900
  # The maximum amount of time a connection may be reused. Expired connections may be closed lazily before reuse. If it <= 0, connections are not closed due to a connection's age.
  # The value is a duration string. A duration string is a possibly signed sequence of decimal numbers, each with optional fraction and a unit suffix, such as "300ms", "-1.5h" or "2h45m". Valid time units are "ns", "us" (or "µs"), "ms", "s", "m", "h".
  conn_max_lifetime: 5m
  # The maximum amount of time a connection may be idle. Expired connections may be closed lazily before reuse. If it <= 0, connections are not closed due to a connection's idle time.
  # The value is a duration string. A duration string is a possibly signed sequence of decimal numbers, each with optional fraction and a unit suffix, such as "300ms", "-1.5h" or "2h45m". Valid time units are "ns", "us" (or "µs"), "ms", "s", "m", "h".
  conn_max_idle_time: 0

# The default data volume
data_volume: /data


trivy:

  ignore_unfixed: false
  skip_update: false
  skip_java_db_update: false
  db_repository: ghcr.io/aquasecurity/trivy-db
  java_db_repository: ghcr.io/aquasecurity/trivy-java-db
  offline_scan: false
  security_check: vuln
  insecure: false
  timeout: 5m0s
jobservice:
  max_job_workers: 10
  max_job_duration_hours: 24
  job_loggers:
    - STD_OUTPUT
    - FILE
  logger_sweeper_duration: 1 #days

notification:
  # Maximum retry count for webhook job
  webhook_job_max_retry: 3
  # HTTP client timeout for webhook job
  webhook_job_http_client_timeout: 3 #seconds

# Log configurations
log:
  # options are debug, info, warning, error, fatal
  level: info
  # configs for logs in local storage
  local:
    # Log files are rotated log_rotate_count times before being removed. If count is 0, old versions are removed rather than rotated.
    rotate_count: 50
    # Log files are rotated only if they grow bigger than log_rotate_size bytes. If size is followed by k, the size is assumed to be in kilobytes.
    # If the M is used, the size is in megabytes, and if G is used, the size is in gigabytes. So size 100, size 100k, size 100M and size 100G
    # are all valid.
    rotate_size: 200M
    # The directory on your host that store log
    location: /var/log/harbor

_version: 2.15.0

proxy:
  http_proxy:
  https_proxy:
  no_proxy:
  components:
    - core
    - jobservice
    - trivy

# Enable purge _upload directories
upload_purging:
  enabled: true
  # remove files in _upload directories which exist for a period of time, default is one week.
  age: 168h
  # the interval of the purge operations
  interval: 24h
  dryrun: false

cache:
  # not enabled by default
  enabled: false
  # keep cache for one day by default
  expire_hours: 24
# 注: harbor服务器的80端口不能被占用,否则服务无法正常启动。否则需要修改配置文件中的端口号。
Ⅵ. 安装服务
./install.sh
# 查看镜像
[root@1 harbor]# docker images
                                                                                                                                                                         i Info →   U  In Use
IMAGE                                   ID             DISK USAGE   CONTENT SIZE   EXTRA
goharbor/harbor-core:v2.15.2            6f0498fbc679        521MB          259MB    U
goharbor/harbor-db:v2.15.2              e1e7a6d32182        715MB          354MB    U
goharbor/harbor-exporter:v2.15.2        8c12051d6434        332MB          165MB
goharbor/harbor-jobservice:v2.15.2      2f068549b1fc        485MB          241MB    U
goharbor/harbor-log:v2.15.2             25325fc182c0        456MB          226MB    U
goharbor/harbor-portal:v2.15.2          684f469dfc8a        425MB          211MB    U
goharbor/harbor-registryctl:v2.15.2     a2f7576589b5        456MB          228MB    U
goharbor/nginx-photon:v2.15.2           f4bed8d2f5ee        407MB          202MB    U
goharbor/prepare:v2.15.2                7faea28802da        541MB          266MB
goharbor/registry-photon:v2.15.2        2c730b6c088a        295MB          147MB    U
goharbor/trivy-adapter-photon:v2.15.2   2135d25681eb        973MB          486MB
goharbor/valkey-photon:v2.15.2          b1c20ea5bc7e        459MB          228MB    U

# 查看容器
[root@1 harbor]# docker ps
CONTAINER ID   IMAGE                                 COMMAND                   CREATED         STATUS                   PORTS                                     NAMES
16b6b57f3d78   goharbor/nginx-photon:v2.15.2         "nginx -g 'daemon of…"   5 minutes ago   Up 5 minutes (healthy)   0.0.0.0:80->8080/tcp, [::]:80->8080/tcp   nginx
1655a0e6d90b   goharbor/harbor-jobservice:v2.15.2    "/harbor/entrypoint.…"   5 minutes ago   Up 5 minutes (healthy)                                             harbor-jobservice
7f3c82abccff   goharbor/harbor-core:v2.15.2          "/harbor/entrypoint.…"   5 minutes ago   Up 5 minutes (healthy)                                             harbor-core
cb37b3dbe7f5   goharbor/harbor-db:v2.15.2            "/docker-entrypoint.…"   5 minutes ago   Up 5 minutes (healthy)                                             harbor-db
f5ffd86dd2f2   goharbor/valkey-photon:v2.15.2        "valkey-server /etc/…"   5 minutes ago   Up 5 minutes (healthy)                                             redis
30745f2a924b   goharbor/harbor-portal:v2.15.2        "nginx -g 'daemon of…"   5 minutes ago   Up 5 minutes (healthy)                                             harbor-portal
6209d08338d4   goharbor/registry-photon:v2.15.2      "/home/harbor/entryp…"   5 minutes ago   Up 5 minutes (healthy)                                             registry
9d890ebfa07a   goharbor/harbor-registryctl:v2.15.2   "/home/harbor/start.…"   5 minutes ago   Up 5 minutes (healthy)                                             registryctl
fa7f60a22ce7   goharbor/harbor-log:v2.15.2           "/bin/sh -c /usr/loc…"   5 minutes ago   Up 5 minutes (healthy)   127.0.0.1:1514->10514/tcp                 harbor-log
真机打开浏览器,输入192.168.100.99:80出现正常访问页面则说明访问成功
Ⅶ. docker-compose常用管理命令
# 停止服务
docker-compose stop

# 启动服务
docker-compose start

# 重启服务
docker-compose restart

# 终止服务并删除容器
docker-compose down

# 启动服务并运行容器
docker-compose up -d
# 注意:这些命令均要在/usr/local/harbor/目录下运行
也可以使用shell函数
然后 source ~/.bashrc 生效。
此时用法就变成了:
  harbor stop
  harbor start
  harbor restart
  harbor down
  harbor up -d
  harbor ps        # 查看状态
  harbor logs -f   # 查看日志
Ⅷ. 在浏览器上登录
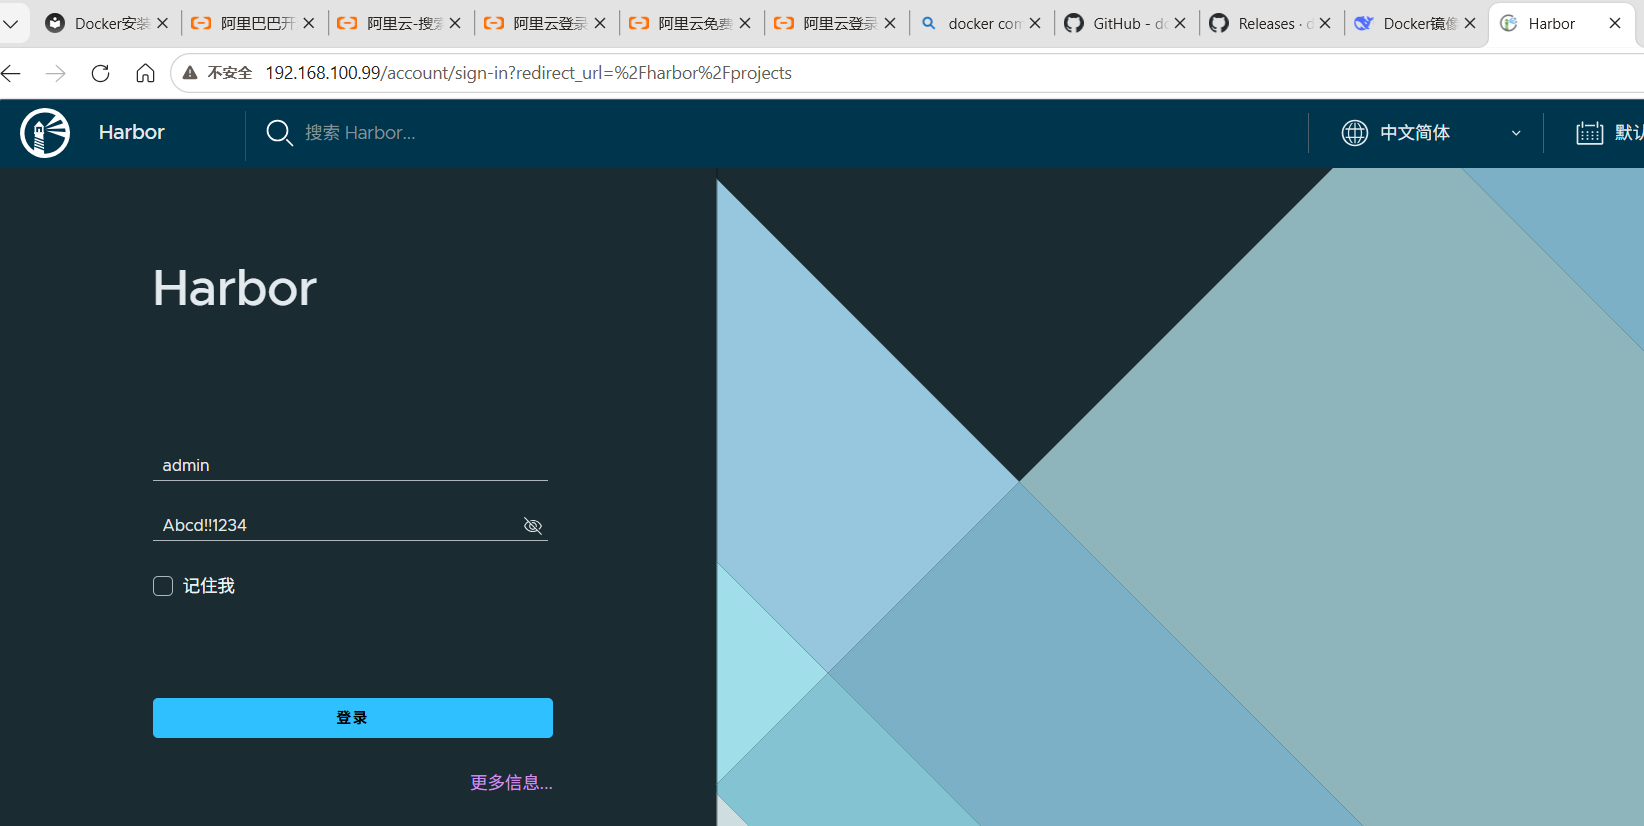
在配置文件中,我们设置了用户名为admin,密码Abcd!!1234
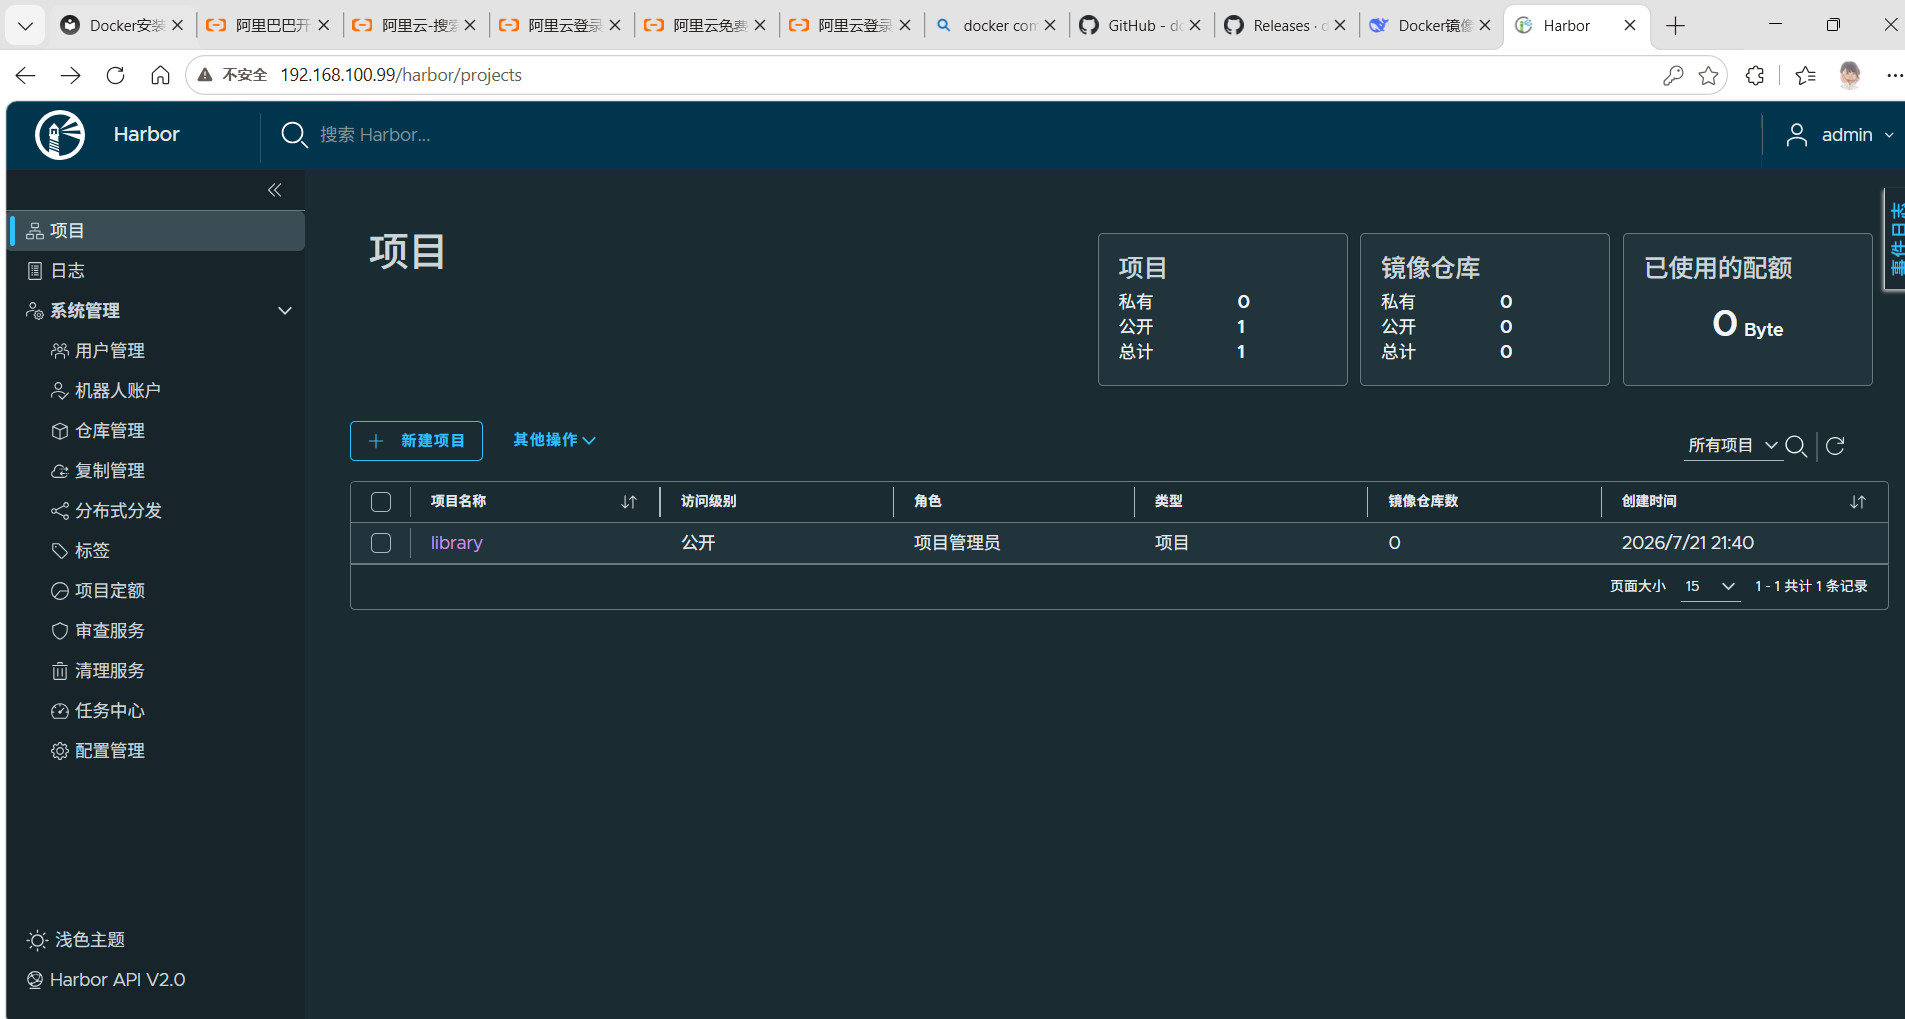
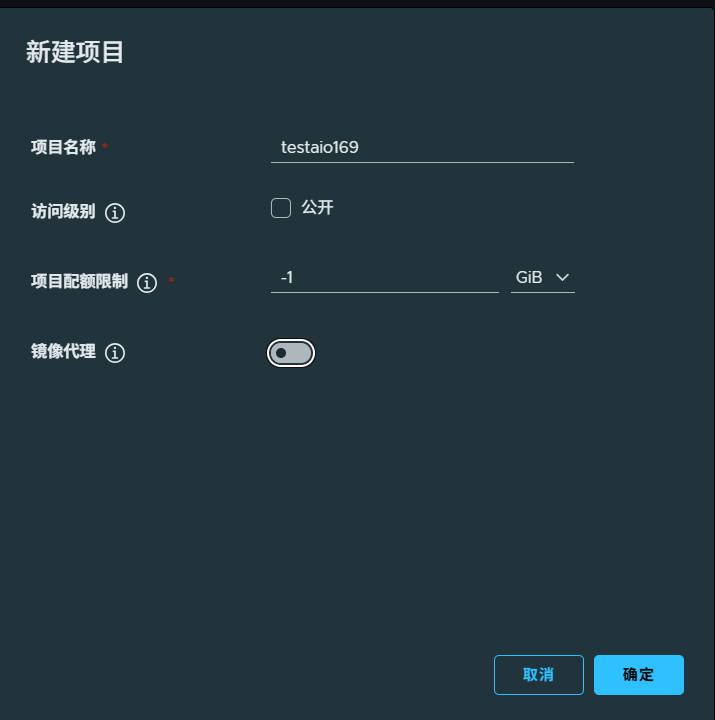
创建项目testaio169,进入项目中 ---> 成员 ---> 用户
创建用户devops,角色至少为开发者
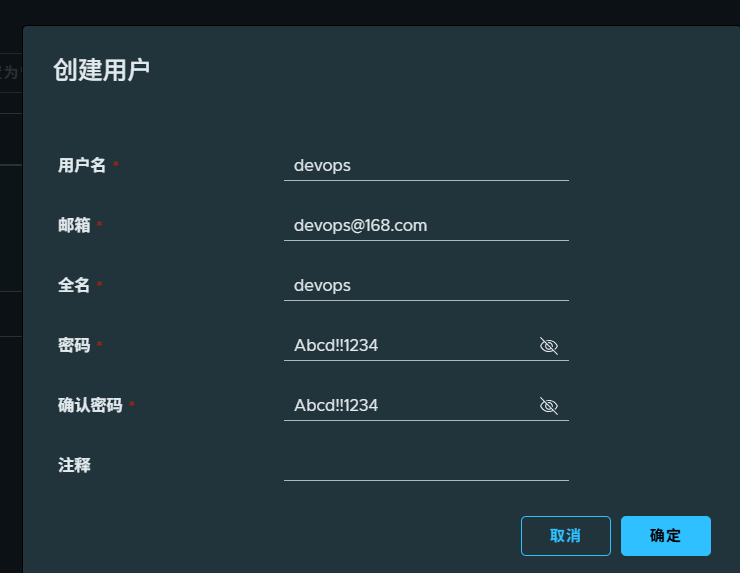
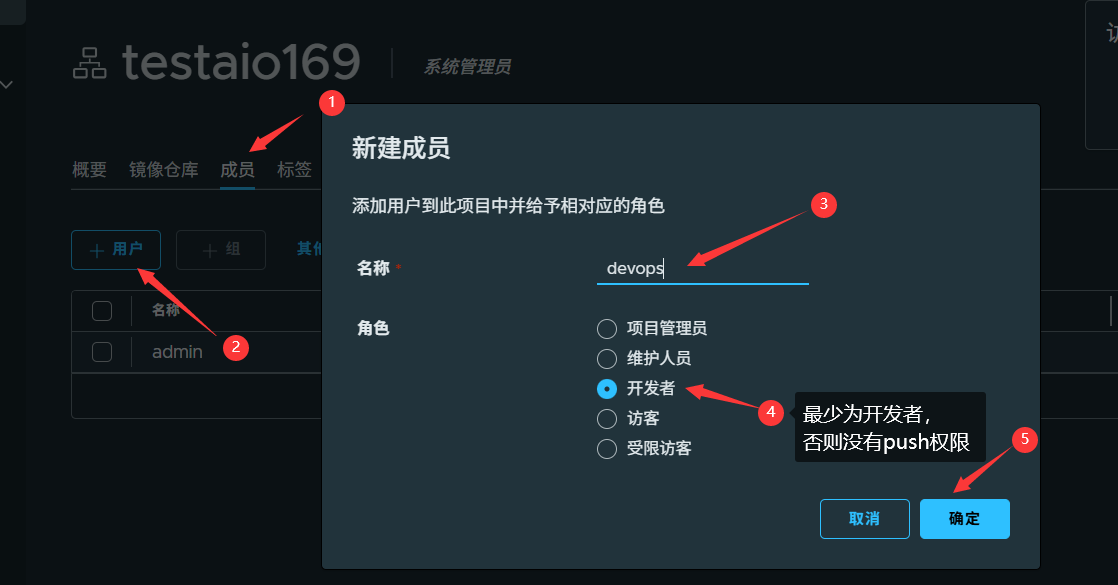
五. 将docker服务器上自行制作的镜像push到harbor中
1. 设置docker仓库
docker访问镜像仓库默认需要使用https协议,修改/etc/docker/daemon.json文件运行使用安全的http访问
  {
    "registry-mirrors": [
      "https://docker.1ms.run",
      "https://docker.xuanyuan.me"
    ],
    "insecure-registries":["192.168.100.99:80"]
  }
2. 利用docker login登录harbor
[root@4 ~]# docker login 192.168.100.99:80
Username: devops
Password:           # 密码为Abcd!!1234

WARNING! Your credentials are stored unencrypted in '/root/.docker/config.json'.
Configure a credential helper to remove this warning. See
https://docs.docker.com/go/credential-store/

Login Succeeded
3. 修改要push镜像的tag
[root@4 ~]# docker images|tail -1
tomcat:v1.5                                                                          402a4f433598       1.04GB          414MB   U
[root@4 ~]# docker tag tomcat:v1.5   192.168.100.99:80/testaio169/mytc:v1.5
4. push镜像到harbor上
[root@4 ~]# docker push 192.168.100.99:80/testaio169/mytc:v1.5
The push refers to repository [192.168.100.99:80/testaio169/mytc]
1d6369a586eb: Pushed
9e30fad9cb1e: Pushed
344bd630c4b0: Pushed
4f4fb700ef54: Pushed
8f217927f3d2: Pushed
ab6b8caf16d7: Pushed
v1.5: digest: sha256:402a4f433598dbded3d733985f8931f78786268c34eb7dbf591cc65e5b0049c8 size: 856
此时就可以在浏览器中看到testaio169中包含有新push的镜像
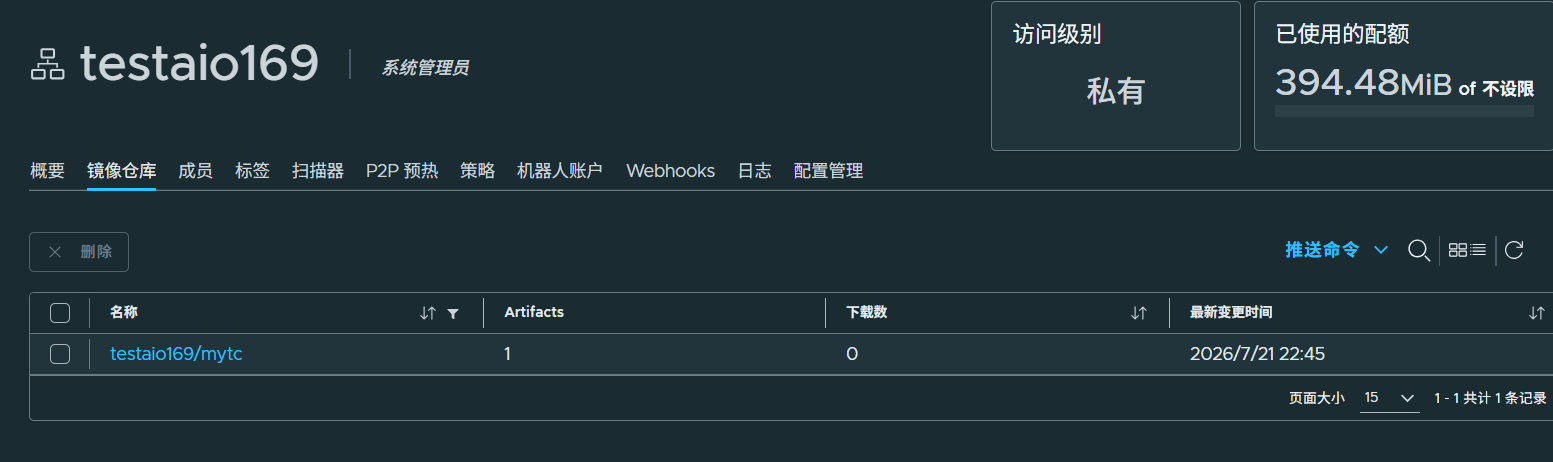
5. docker退出登录
六. springboot+maven+harbor+docker
1. 流程
java源代码 ---> 利用jar源代码打包成jar包 ----- maven ---> 利用jar包和dockerfile制作镜像 ---> 将镜像推送到harbor上 ---> 测试环境,从harbor拉取镜像并制作为容器
2. 环境
192.168.100.102 制作镜像
192.168.100.99 harbor镜像仓库
192.168.100.103 测试环境
3. 三台主机分别安装docker
mount /dev/sr0 /media/cdrom
dnf -y install yum-utils
rpm -ivh  https://mirrors.aliyun.com/epel/epel-release-latest-9.noarch.rpm
sed -i 's|^#baseurl=https://download.example/pub|baseurl=https://mirrors.aliyun.com|' /etc/yum.repos.d/epel*
sed -i 's|^metalink|#metalink|' /etc/yum.repos.d/epel*
yum-config-manager --add-repo https://mirrors.aliyun.com/docker-ce/linux/centos/docker-ce.repo
dnf clean all && dnf makecache
dnf -y install docker-ce docker-ce-cli containerd.io docker-buildx-plugin docker-compose-plugin
  sudo mkdir -p /etc/docker
  sudo tee /etc/docker/daemon.json <<-'EOF'
  {
    "registry-mirrors": [
      "https://docker.1ms.run",
      "https://docker.xuanyuan.me"
    ]
  }
EOF
systemctl start docker
systemctl enable docker
在192.168.100.99上安装harbor服务
执行以下命令
wget https://github.com/goharbor/harbor/releases/download/v2.15.2/harbor-offline-installer-v2.15.2.tgz
tar xf harbor-offline-installer-v2.15.2.tgz -C /usr/local/
cp /usr/local/harbor/harbor.yml.tmpl /usr/local/harbor/harbor.yml
cat << 'EOF' > /usr/local/harbor/harbor.yml
hostname: 192.168.100.99
http:
  port: 80
harbor_admin_password: Abcd!!1234
database:
  password: root123
  max_idle_conns: 100
  max_open_conns: 900
  conn_max_lifetime: 5m
  conn_max_idle_time: 0
data_volume: /data
trivy:
  ignore_unfixed: false
  skip_update: false
  skip_java_db_update: false
  db_repository: ghcr.io/aquasecurity/trivy-db
  java_db_repository: ghcr.io/aquasecurity/trivy-java-db
  offline_scan: false
  security_check: vuln
  insecure: false
  timeout: 5m0s
jobservice:
  max_job_workers: 10
  max_job_duration_hours: 24
  job_loggers:
    - STD_OUTPUT
    - FILE
  logger_sweeper_duration: 1 #days
notification:
  webhook_job_max_retry: 3
  webhook_job_http_client_timeout: 3 #seconds
log:
  level: info
  local:
    rotate_count: 50
    rotate_size: 200M
    location: /var/log/harbor
_version: 2.15.0
proxy:
  http_proxy:
  https_proxy:
  no_proxy:
  components:
    - core
    - jobservice
    - trivy
upload_purging:
  enabled: true
  age: 168h
  interval: 24h
  dryrun: false
cache:
  enabled: false
  expire_hours: 24
EOF
/usr/local/harbor/install.sh
cat << 'EOF' >> ~/.bashrc
  harbor() {
    ( cd /usr/local/harbor && docke compose "$@" )
  }
EOF
source ~/.bashrc
harbor start
4. 在4上安装jdk21,maven
wget https://download.oracle.com/java/21/latest/jdk-21_linux-x64_bin.tar.gz
wget https://dlcdn.apache.org/maven/maven-3/3.9.16/binaries/apache-maven-3.9.16-bin.tar.gz
tar -xf apache-maven-3.9.16-bin.tar.gz -C /usr/local
tar -xf jdk-21_linux-x64_bin.tar.gz -C /usr/local
tee /etc/profile.d/java.sh << 'EOF'
  export JAVA_HOME=/usr/local/jdk-21
  export PATH=$JAVA_HOME/bin:$PATH
EOF
source /etc/profile.d/java.sh