利用nginx完成反向代理高可用集群并利用自签名证书完成https域名注册
一. 拓扑图
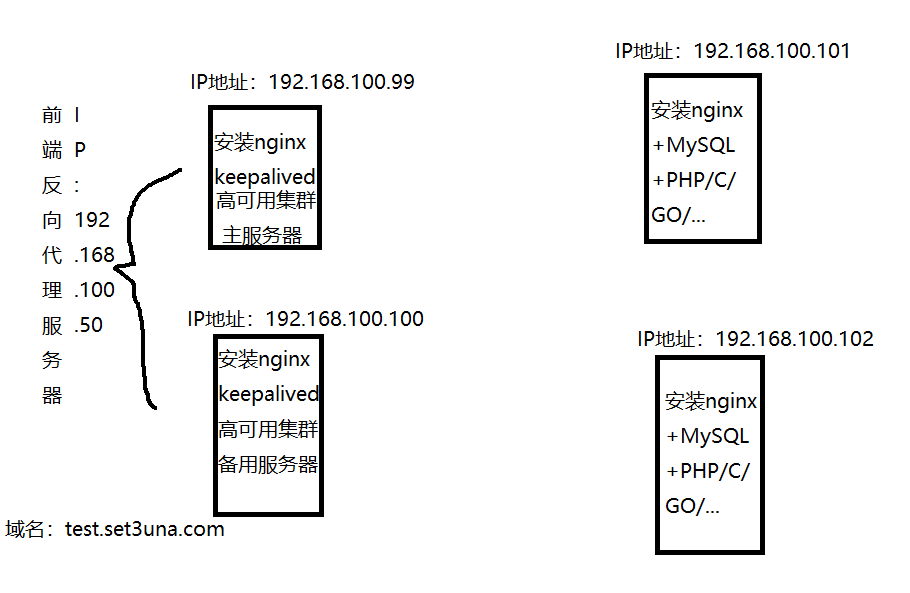
二. 配置后端服务器
1. 给两台后端服务器安装nginx和mysql
Ⅰ. 安装nginx和MySQL
[root@4 ~]#mount /dev/sr0 /media/cdrom
mount: /media/cdrom: WARNING: source write-protected, mounted read-only.
[root@4 ~]# dnf -y install nginx mysql-server mysql
[root@3 ~]# mount /dev/sr0 /media/cdrom
mount: /media/cdrom: WARNING: source write-protected, mounted read-only.
[root@3 ~]# dnf -y install nginx mysql-server mysql
Ⅱ. 写入用于测试的web文件
[root@4 ~]#mkdir -p /var/www/web4
[root@4 ~]#echo "This is web4 192.168.100.102">/var/www/web4/index.html
[root@3 ~]# mkdir -p /var/www/web3
[root@3 ~]# echo "This is web3 192.168.100.101">/var/www/web3/index.html
Ⅲ. 修改两台电脑的nginx配置文件
[root@3 ~]# vi /etc/nginx/conf.d/web3.conf
[root@4 ~]# vi /etc/nginx/conf.d/web4.conf
Ⅳ. 验证语法无误后启动nginx,然后访问验证
[root@3 ~]# nginx -t
nginx: the configuration file /etc/nginx/nginx.conf syntax is ok
nginx: configuration file /etc/nginx/nginx.conf test is successful
[root@3 ~]# systemctl start nginx
[root@3 ~]# curl 192.168.100.101
This is web3 192.168.100.101
[root@4 ~]#nginx -t
nginx: the configuration file /etc/nginx/nginx.conf syntax is ok
nginx: configuration file /etc/nginx/nginx.conf test is successful
[root@4 ~]#systemctl start nginx
[root@4 ~]#curl 192.168.100.102
This is web4 192.168.100.102
2. 配置前端服务器1的反向代理
Ⅰ. 安装nginx
[root@1 ~]# dnf -y install nginx
Ⅱ. 修改nginx配置文件
[root@1 ~]# vi /etc/nginx/conf.d/proxy-lab.conf
upstream backend_cluster {
    server 192.168.100.101;
    server 192.168.100.102;
}

server {
    listen 80;
    server_name 192.168.100.99;

    # ===== 健康检查接口(和 location / 平级) =====
    location /health {
        access_log off;
        return 200 "OK\n";
    }
    # =============================================

    location / {
        proxy_pass http://backend_cluster;
        proxy_set_header Host $host;
        # 必须加上:传递原始域名(解决缺陷)
        proxy_set_header X-Real-IP $remote_addr;
        proxy_set_header X-Forwarded-For $proxy_add_x_forwarded_for;
        # 必须加上:传递真实客户端 IP
    }
}
Ⅲ. 语法检测,无误后启动服务
[root@1 ~]# nginx -t
nginx: the configuration file /etc/nginx/nginx.conf syntax is ok
nginx: configuration file /etc/nginx/nginx.conf test is successful
[root@1 ~]# systemctl start nginx
Ⅳ. 换到5,访问验证
[root@5 markdown-project]# curl 192.168.100.99
This is web3 192.168.100.101
[root@5 markdown-project]# curl 192.168.100.99
This is web4 192.168.100.102
[root@5 markdown-project]# curl 192.168.100.99
This is web3 192.168.100.101
[root@5 markdown-project]# curl 192.168.100.99
This is web4 192.168.100.102
3. 利用keepalived实现1和2高可用集群
Ⅰ. 在2上安装nginx和keepalived,在1上安装keepalived
[root@2 ~]# dnf -y install nginx keepalived
[root@1 ~]# dnf -y install keepalived
Ⅱ. 在1上编写监控脚本,然后传给2
[root@1 ~]# vi /usr/local/bin/check_nginx.sh
#!/bin/bash

if ! pgrep -x "nginx" > /dev/null;
    then
        exit 1
fi
#如果nginx进程号不存在,则退出并返回1
if ! ss -tln|grep -q ":80";
    then
        exit 1
fi
#如果端口80没有被占用,则退出并返回1
if curl -s -f -m 2 http://127.0.0.1/health > /dev/null;
    then
        exit 0
    else
        exit 1
fi
#如果curl http://127.0.0.1/health成功则返回0,否则返回1
[root@1 ~]# scp /usr/local/bin/check_nginx.sh root@192.168.100.100:/usr/local/bin/check_nginx.sh
Ⅲ. 修改keepalived配置文件
a. 在1上安装keepalived,并修改配置文件
[root@1 ~]# vi /etc/keepalived/keepalived.conf
    ! Configuration File for keepalived

    global_defs {
    notification_email {
        acassen@firewall.loc
    }
    notification_email_from Alexandre.Cassen@firewall.loc
    #smtp_server 192.168.200.1
    #smtp_connect_timeout 30
    router_id LVS_DEVEL
    vrrp_skip_check_adv_addr
    vrrp_garp_interval 0
    vrrp_gna_interval 0
    }

    vrrp_script chk_nginx {
    script "/usr/local/bin/check_nginx.sh"
    interval 2
    timeout 2
    weight -20
    fall 3
    rise 3
    }

    vrrp_instance VI_1 {
        state MASTER
        interface ens160
        virtual_router_id 51
        priority 100
        advert_int 1
        authentication {
            auth_type PASS
            auth_pass wensir
        }
        virtual_ipaddress {
            192.168.100.50/24 dev ens160
        }
        track_script {
        chk_nginx
        }
        unicast_src_ip 192.168.100.99
        unicast_peer {
        192.168.100.100
        }
    }
b. 在2上安装keepalived,并修改配置文件
二号机的 keepalived.conf 配置如下:
    ! Configuration File for keepalived

    global_defs {
    notification_email {
        acassen@firewall.loc
        #failover@firewall.loc
        #sysadmin@firewall.loc
    }
    notification_email_from Alexandre.Cassen@firewall.loc
    router_id LVS_DEVEL
    vrrp_skip_check_adv_addr
    vrrp_garp_interval 0
    vrrp_gna_interval 0
    }

    vrrp_script chk_nginx {
    script "/usr/local/bin/check_nginx.sh"
    !主动健康检查配置文件的位置
    interval 2
    timeout 2
    weight -20
    fall 3
    rise 3
    }

    vrrp_instance VI_1 {
        state BACKUP
        interface ens160
        virtual_router_id 51
        priority 90
        advert_int 1
        authentication {
            auth_type PASS
            auth_pass wensir
        }
        virtual_ipaddress {
            192.168.100.50/24 dev ens160
        }
        track_script {
        chk_nginx
        }
        unicast_src_ip 192.168.100.100
        !当前主机的IP地址
        unicast_peer {
        192.168.100.99
        !另一台主机的IP地址
        }
    }
Ⅳ. 修改nginx配置文件
修改nginx的配置文件,1和2相同
[root@1 ~]# vi /etc/nginx/conf.d/proxy-lab.conf
[root@1 ~]# nginx -t
nginx: the configuration file /etc/nginx/nginx.conf syntax is ok
nginx: configuration file /etc/nginx/nginx.conf test is successful
[root@1 ~]# systemctl reload nginx
keepalive_requests 1000;
#设置长连接最多可以处理的请求为1000,访问数量大于1000时nginx关闭远程连接并建立新的连接
upstream backend_cluster {
    server 192.168.100.101 max_fails=3 fail_timeout=10s;
    server 192.168.100.102 max_fails=3 fail_timeout=10s;
    keepalive 16;                     # ← 控制 Nginx → 后端的长连接池大小
}

server {
    listen 80;
    server_name www.wensir.com;
    location / {
        proxy_pass http://backend_cluster;
        proxy_set_header Host $host;  #必须加上:传递原始域名(解决缺陷一)
        proxy_set_header X-Real-IP $remote_addr;
        proxy_set_header X-Forwarded-For $proxy_add_x_forwarded_for;
        #必须加上:传递真实客户端 IP
        proxy_next_upstream error timeout http_500 http_502 http_503 http_504;
        #如果所有服务器都失败,则向客户端返回 5XX 错误。
        proxy_connect_timeout 2s;
        #如果 2 秒内连接未建立成功,视为超时,会重试下一个后端服务器。
        proxy_read_timeout 5s;
        #定义 Nginx 向后端服务器发送请求后,等待其返回响应数据的超时时间。如果发送请求后5s内后端服务器没有返回任何结果,视为超时。会重试下一个后端服务器。
        proxy_http_version 1.1;
        proxy_set_header Connection "";
    }
    location /health {           #健康检查
        access_log off;
        return 200 "OK\n";
    }
}
Ⅴ. 利用5访问验证,然后关闭1再次访问验证查看IP地址
a. 先看1和2的IP地址
[root@1 ~]# ip address show ens160
2: ens160: <BROADCAST,MULTICAST,UP,LOWER_UP> mtu 1500 qdisc mq state UP group default qlen 1000
    link/ether 00:0c:29:08:45:47 brd ff:ff:ff:ff:ff:ff
    altname enp3s0
    inet 192.168.100.99/24 brd 192.168.100.255 scope global noprefixroute ens160
       valid_lft forever preferred_lft forever
    inet 192.168.100.50/24 scope global secondary ens160
       valid_lft forever preferred_lft forever
    inet6 fe80::20c:29ff:fe08:4547/64 scope link noprefixroute
       valid_lft forever preferred_lft forever

[root@2 ~]# ip address show ens160
2: ens160: <BROADCAST,MULTICAST,UP,LOWER_UP> mtu 1500 qdisc mq state UP group default qlen 1000
    link/ether 00:0c:29:10:5f:32 brd ff:ff:ff:ff:ff:ff
    altname enp3s0
    inet 192.168.100.100/24 brd 192.168.100.255 scope global noprefixroute ens160
       valid_lft forever preferred_lft forever
    inet6 fe80::20c:29ff:fe10:5f32/64 scope link noprefixroute
       valid_lft forever preferred_lft forever
b. 修改5的hosts配置文件,然后访问验证www.wensir.com
[root@5 markdown-project]# echo "192.168.100.50  www.wensir.com">>/etc/hosts
[root@5 markdown-project]# curl www.wensir.com
This is web3 192.168.100.101
[root@5 markdown-project]# curl www.wensir.com
This is web4 192.168.100.102
[root@5 markdown-project]# curl www.wensir.com
This is web3 192.168.100.101
[root@5 markdown-project]# curl www.wensir.com
This is web4 192.168.100.102
c. 关闭1的nginx,然后验证IP地址是否漂移到2,之后再次打开1
[root@1 ~]# systemctl stop nginx
[root@1 ~]# ip address show ens160
2: ens160: <BROADCAST,MULTICAST,UP,LOWER_UP> mtu 1500 qdisc mq state UP group default qlen 1000
    link/ether 00:0c:29:08:45:47 brd ff:ff:ff:ff:ff:ff
    altname enp3s0
    inet 192.168.100.99/24 brd 192.168.100.255 scope global noprefixroute ens160
       valid_lft forever preferred_lft forever
    inet6 fe80::20c:29ff:fe08:4547/64 scope link noprefixroute
       valid_lft forever preferred_lft forever

[root@2 ~]# ip address show ens160
2: ens160: <BROADCAST,MULTICAST,UP,LOWER_UP> mtu 1500 qdisc mq state UP group default qlen 1000
    link/ether 00:0c:29:10:5f:32 brd ff:ff:ff:ff:ff:ff
    altname enp3s0
    inet 192.168.100.100/24 brd 192.168.100.255 scope global noprefixroute ens160
       valid_lft forever preferred_lft forever
    inet 192.168.100.50/24 scope global secondary ens160
       valid_lft forever preferred_lft forever
    inet6 fe80::20c:29ff:fe10:5f32/64 scope link noprefixroute
       valid_lft forever preferred_lft forever


[root@1 ~]# systemctl start nginx
[root@1 ~]# ip address show ens160
2: ens160: <BROADCAST,MULTICAST,UP,LOWER_UP> mtu 1500 qdisc mq state UP group default qlen 1000
    link/ether 00:0c:29:08:45:47 brd ff:ff:ff:ff:ff:ff
    altname enp3s0
    inet 192.168.100.99/24 brd 192.168.100.255 scope global noprefixroute ens160
       valid_lft forever preferred_lft forever
    inet 192.168.100.50/24 scope global secondary ens160
       valid_lft forever preferred_lft forever
    inet6 fe80::20c:29ff:fe08:4547/64 scope link noprefixroute
       valid_lft forever preferred_lft forever

[root@2 ~]# ip address show ens160
2: ens160: <BROADCAST,MULTICAST,UP,LOWER_UP> mtu 1500 qdisc mq state UP group default qlen 1000
    link/ether 00:0c:29:10:5f:32 brd ff:ff:ff:ff:ff:ff
    altname enp3s0
    inet 192.168.100.100/24 brd 192.168.100.255 scope global noprefixroute ens160
       valid_lft forever preferred_lft forever
    inet6 fe80::20c:29ff:fe10:5f32/64 scope link noprefixroute
       valid_lft forever preferred_lft forever
4. 在1和2上申请证书,将www.wensir.com做成https域名解析
Ⅰ. 安装openssl
[root@1 ~]# dnf -y install openssl openssl-devel
Ⅱ. 创建专门存放证书的的目录
Ⅲ. 生成私钥
Ⅳ. 生成证书请求
[root@1 self-signed]# openssl req -new -key server.key -out server.csr -subj "/C=CN/ST=TJ/L=TJ/O=wen/CN=www.wensir.com"
[root@1 self-signed]# ls
server.csr  server.key
Ⅴ. 生成自签名证书
[root@1 self-signed]# openssl x509 -req -days 365 -in server.csr -signkey server.key -out server.crt
Certificate request self-signature ok
subject=C=CN, ST=TJ, L=TJ, O=wen, CN=www.wensir.com
Ⅵ. 将自签证书传到另一台机器上
[root@1 self-signed]# scp -r /etc/ssl/self-signed root@192.168.100.100:/etc/ssl/
server.key                          100% 3272     3.9MB/s   00:00
server.csr                          100% 1663     2.6MB/s   00:00
server.crt                          100% 1895     3.5MB/s   00:00
Ⅶ. 修改1的配置文件,绑定https,给2做相同操作
[root@1 self-signed]# cd
[root@1 ~]# vi /etc/nginx/conf.d/proxy-lab.conf
[root@1 ~]# nginx -t
nginx: the configuration file /etc/nginx/nginx.conf syntax is ok
nginx: configuration file /etc/nginx/nginx.conf test is successful
[root@1 ~]# systemctl restart nginx
keepalive_requests 1000;
#设置长连接最多可以处理的请求为1000,访问数量大于1000时nginx关闭远程连接并建立新的连接
upstream backend_cluster {
    server 192.168.100.101;
    server 192.168.100.102;
    keepalive 16;                     # ← 控制 Nginx → 后端的长连接池大小
}

server {
    listen 80;
    server_name 192.168.100.50;
    # 将 HTTP 请求永久重定向到 HTTPS,保留原始请求路径
    # 使用域名而非 $server_name,确保与自签名证书的 CN 匹配
    return 301 https://www.wensir.com$request_uri;
}

server {
    listen 443 ssl http2;
    #启用ssl并监听443端口,启用http2协议
    server_name www.wensir.com;
    ssl_certificate /etc/ssl/self-signed/server.crt;        #ssl证书路径
    ssl_certificate_key /etc/ssl/self-signed/server.key;    #ssl私钥路径
    ssl_protocols TLSv1.2 TLSv1.3;
    #只允许tls版本1.2和1.3,其他版本有漏洞
    #老浏览器( IE < 11 )会无法访问,换来的是安全
    ssl_ciphers HIGH:!aNULL:!MD5;
    #HIGH:高强度,也就是不得低于AES-128/256 chacha20等)
    #!aNULL:禁用“匿名密钥交换”(无身份验证无法访问)
    #!MD5:禁用已碰撞成功的MD5摘要(签名,密钥都不在使用MD5)
    #隐含:禁止3DES RC4 EXPORT 等

    ssl_prefer_server_ciphers on;

    location / {
        proxy_pass http://backend_cluster;
        proxy_set_header Host $host;  #必须加上:传递原始域名(解决缺陷一)
        proxy_set_header X-Real-IP $remote_addr;
        proxy_set_header X-Forwarded-For $proxy_add_x_forwarded_for;
        #必须加上:传递真实客户端 IP
        proxy_next_upstream error timeout http_500 http_502 http_503 http_504;
        #如果所有服务器都失败,则向客户端返回 5XX 错误。
        proxy_connect_timeout 2s;
        #如果 2 秒内连接未建立成功,视为超时,会重试下一个后端服务器。
        proxy_read_timeout 5s;
        #定义 Nginx 向后端服务器发送请求后,等待其返回响应数据的超时时间。如果发送请求后5s内后端服务器没有返回任何结果,视为超时。会重试下一个后端服务器。
        proxy_http_version 1.1;
        proxy_set_header Connection "";
    }
    location /health {           #健康检查
        access_log off;
        return 200 "OK\n";
    }
}
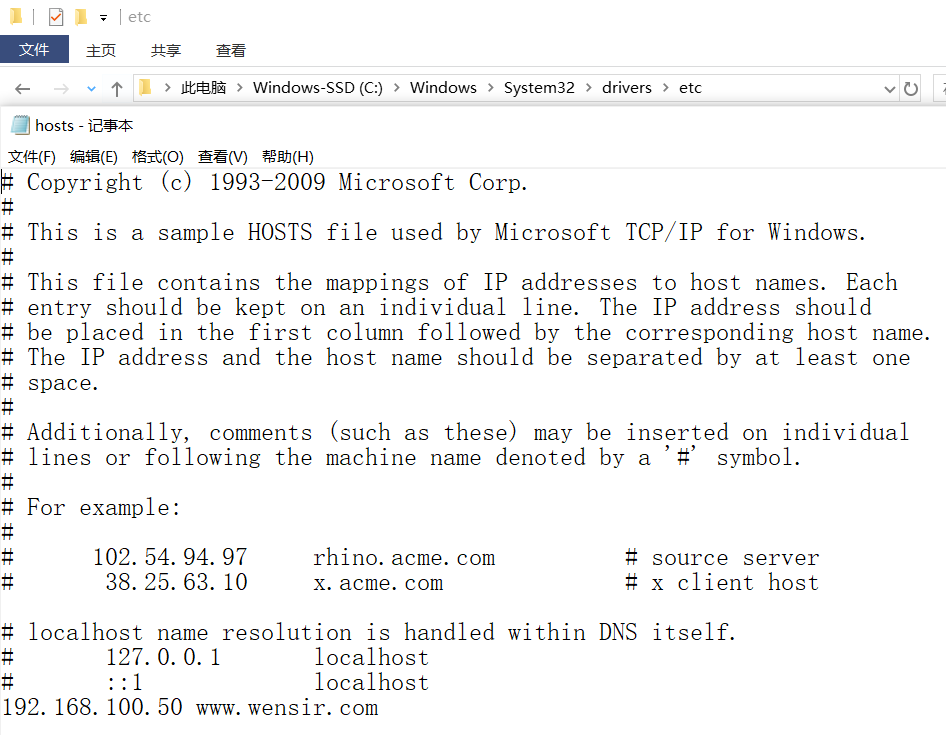
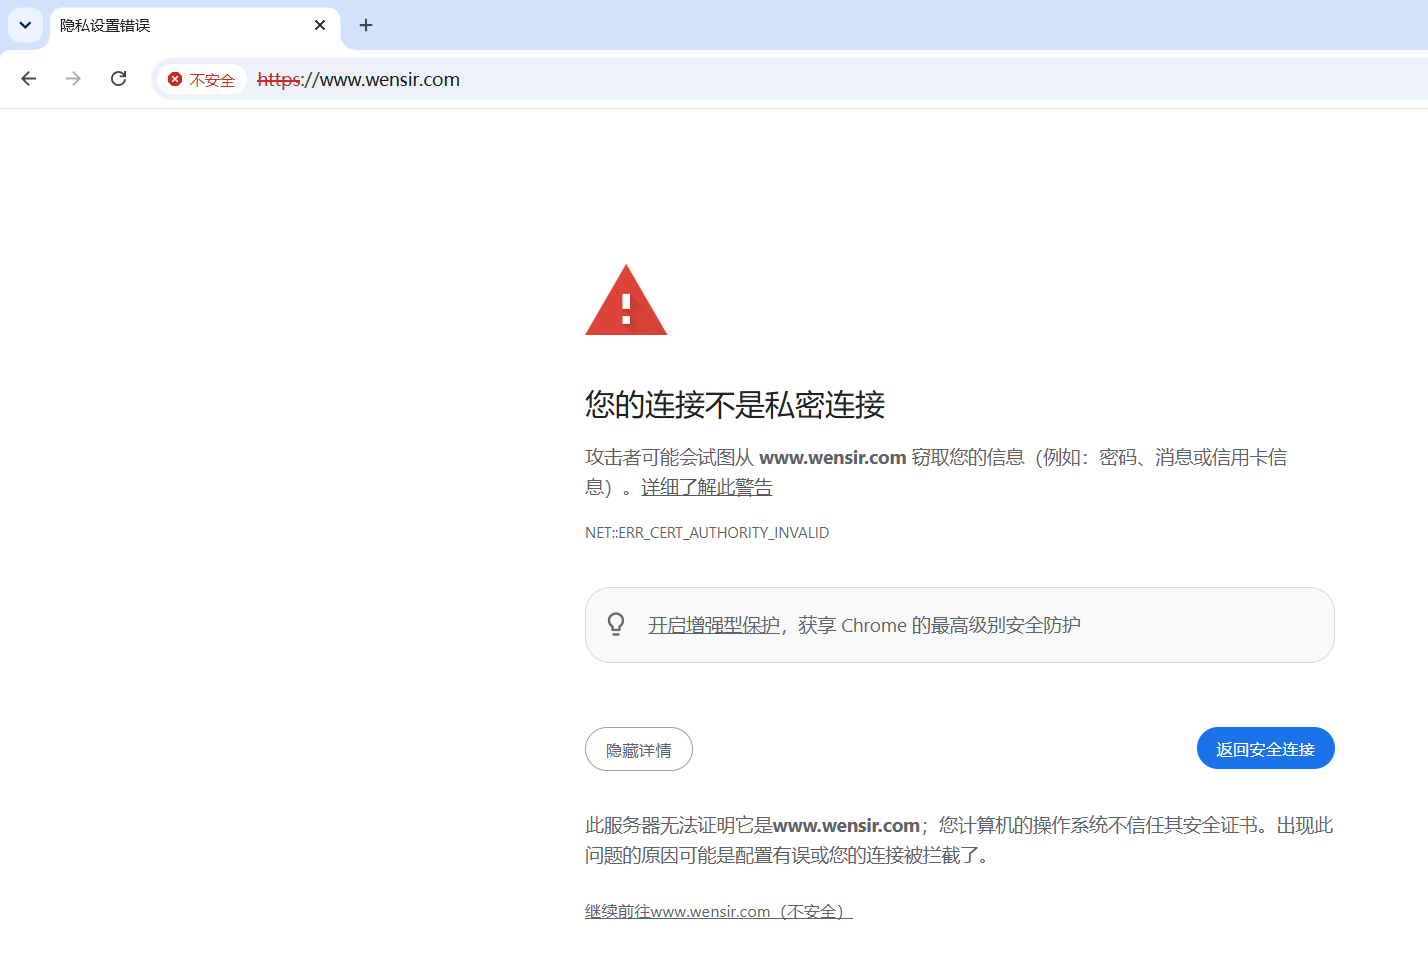
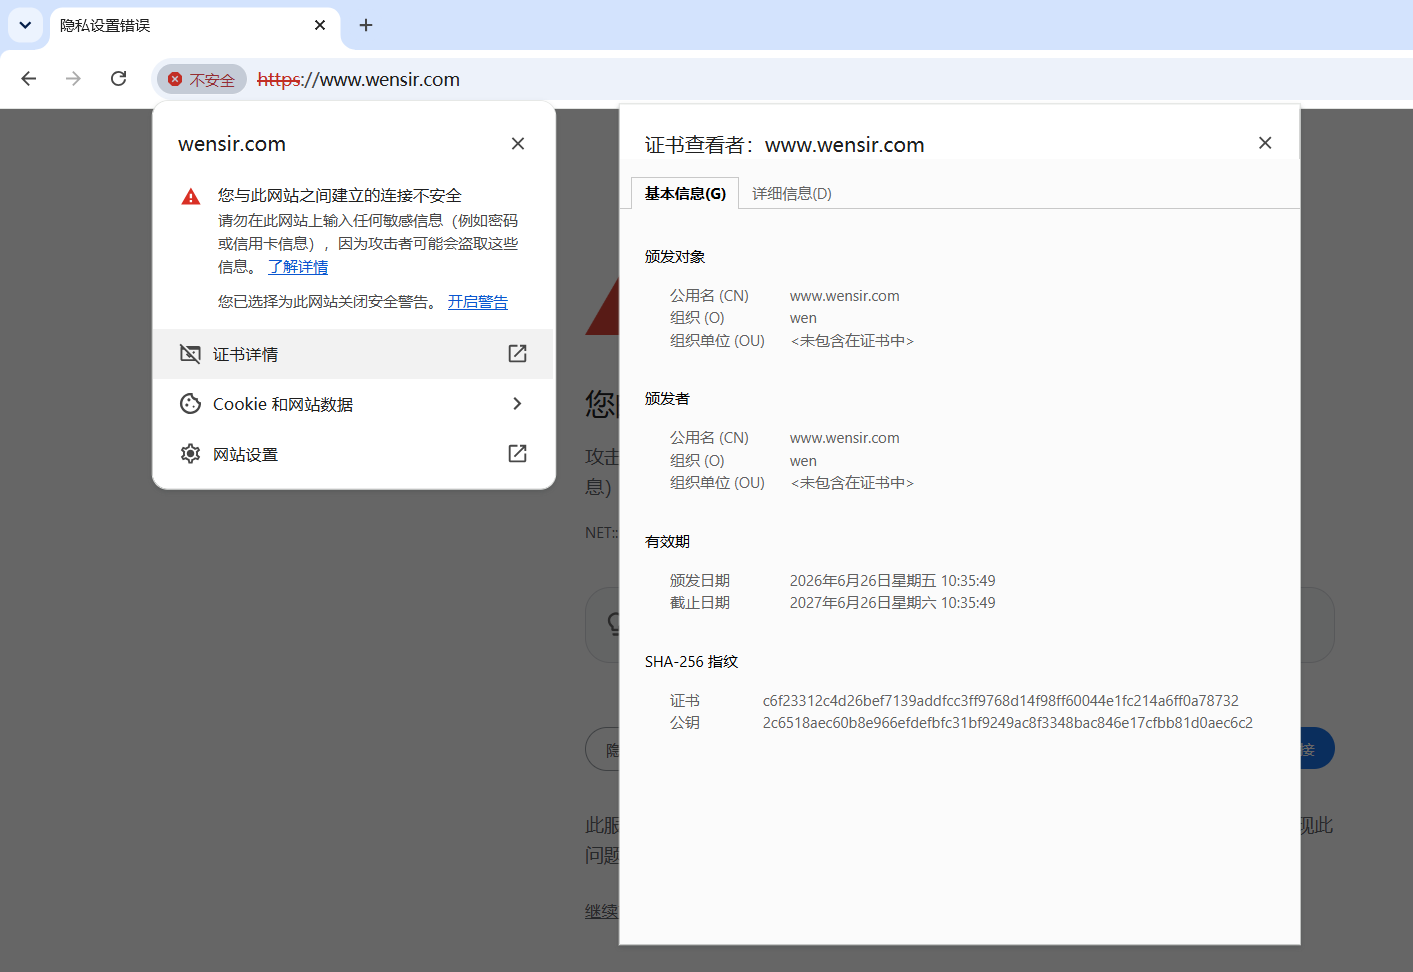
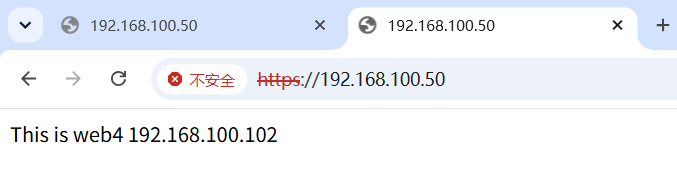
5. 真机访问验证